
When you are en route to finding comfort, the only limitations are those in your brain. You can buy nearly the whole world with money, and my recliner is genuinely an entire universe to me. I am a health professional, pressed under the responsibilities of a crucial government job and confronting my health issues.
After getting home, I love to live a hermit-like lifestyle, and the reason is that I love the comfort of my family and my recliner. But how can I forget the hassle my recliner caused me when it went unfunctional repeatedly? I left no stone unturned to fix it until I had to visit the experts many times, and there, I also learned to fine-tune it myself.
There is a difference between a manual recliner and an electronic recliner. You would need to call an expert to overhaul an electronic recliner, and if it is a manual recliner, then I will discuss how to adjust your recliner?
Read also: How To Clean Your Recliner
The primary issues with a manual recliner that you can deal with at home are three.
- Adjusting the tension of a recliner
- Replacement of the springs of recliner
- Customizing the pitch of the recliner
Adjusting The Tension of The Recliner
Diagnosis of the issue
It’s necessary to test the tension of the recliner before checking for mechanical issues inside the recliner. A lever or a button typically operates the reclining backrest on the right side of the recliner.
Sometimes, it takes too much effort to recline back while adjusting the backrest position, or it may lean back freely with no resistance.
Pull the lever up or push the button to recline back and put pressure on the backrest. If the recliner leans back comfortably, stop the lever or stop pressing the button. If you still need to increase or decrease the recliner’s tension, then read further.
What is the tension in a recliner?
It is significant to know the crux of the matter. What does the tension of a recliner mean?
The tension of a recliner means how much force you need to apply to lean back the recliner’s backrest.
There are two possibilities.
- The first investigation is that you sit in the recliner and push back the seat, but it is of no use. You need to put more pressure on the backrest. In this incident, you need to decrease the tension.
- On the other hand, you sit in the recliner, and it’s effortless to lean back; here, the tension is pretty gentle, and you need to screw it tight.
Read also: Working Mechanism of Recliners
How do I put the Tension in Working Order?
“Adjusting the wing nuts will adjust the tension of the recliner.”
There are several models of recliners. Most of them come with wing nuts or thumb screws that are as easy to fix as an apple pie. In contrast, some models require some tools for their adjustment.
Generally, if you are a healthy or taller person and need a strong back of the chair, you would have to tighten up the thumbscrews to increase the tension.
On the other hand, if you are a shorter or slender person and want to recline back with little resistance, rotate the thumbscrews counterclockwise to decrease the tension.
Follow these easy steps to adjust the recliner’s tension on your own.
- To address the tension in a recliner, you need to reach the adjustment mechanism. In a manual recliner, you can find it beneath the chair.
- Now shut off the footrest and recline the backrest in a vertical position. It’s time to tilt the chair at an angle with its bottom in an upright position and the armrest facing the floor so that you can approach the inner side of the chair.
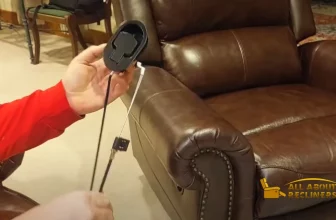
- In this position, you can easily find out that the adjustment mechanism is typically controlled by a pair of wing nuts or thumb screws planted on the back or bottom of the chair, with each of them positioned at the end of the bolts. These wing nuts are designed to be adjusted without any wrench, but you might need a wing nut spanner to deal with some stubborn wing nuts if they do hurt your fingers.
- Rotate the wing nut clockwise to increase the tension and counterclockwise to decrease the tension. You can remember it as the right to tighten and the left to lose. To ensure the perfect balance of the chair, attune both wing nuts with the same intensity.
- Ensure not to tighten the wing nut with hard muscle or lose more than the bolt’s tip, as it may cause the spring coiled over the bolt to break or relax the chair’s resistance to move freely, so rotate the wingnuts in half-turns or check them after each turn.
- Once you have done adjusting the wing nuts, test the customization you have made. Turn the chair back to its sitting posture, sit in it, push the backrest, and extend the footrest. If you find that the backrest and footrest are comfortable enough to satisfy you, then recline back and relax. If it is not, then you may need to make some more modifications.
Pro Tips
- You may fix the adjustments barehanded, but it’s better to grab a pair of gloves, pliers, and a wrench.
- If the recliner is heavy, then find someone to assist you. It’s not recommended to bend the chair on your own, as repeatedly turning the chair alone may leave you exasperated.
Read also: How To Repair A Recliner
Replacement of The Springs of Recliner
Most recliners come with zigzag or coiled springs fixed beneath the padded seat of the recliner. If your recliner makes any annoying noise, be sure that these are the springs causing the noise.
Diagnosis of the issue
If the recliner’s backrest or the footrest is free to move with no resistance, then the springs might be broken and need to be replaced.
Frequent pressure on the springs can cause the springs to lose their flexibility and become rigid. You can easily replace the misplaced or broken springs on your own, which will save you money and time.
As we detected the issue, it’s time to fix the problematic springs without any further addition.
Step 1
You need to repeat the same procedure as discussed earlier to reach the wingnuts and expose the inside frame of the chair. Bend the whole recliner forward with the backrest in an upright position, the armrest facing the floor, and the footrest closed.
If your recliner is padded or laminated with fabric, then clear it away with the help of scissors or a screwdriver, and remember to unstitch the material in a manner to reattach it again after repairing.
You need to differentiate the type of springs as the procedure varies accordingly.
Coiled Spring
If it is a coiled spring and is detached from the hook and looks pleasing to work with the tension, then grab it firmly with the help of a plier to extend it and then hook it back where it was positioned previously.
In the event of a damaged spring, purchase a new compatible spring that can be fixed in the same position. Now you need two of the pliers to fix the spring back. Attach one end of the spring to the hook, then grab the other end with the help of a plier and extend it to fix it to the other hook. Check the recliner tension to see if it works correctly or not before moving on to the next step.
Zigzag Spring
Zigzag springs are usually lying flat beneath the recliner. If one of the zigzag springs beneath your recliner is broken, it causes you to sink in the recliner. If you find that, then replace the spring.
Read also: How to Fix a Recliner Cable?
Step 2
These tension springs are firmly held with the help of a frame, and the frame is fixed with bolts. Use a flashlight to locate the bolts holding the frame, and unbolt them with the help of an adjustable wrench or a screwdriver.
Lose all the bolts one by one with the same intensity until all the bolts come out, and you can detach the frame from the mechanism. Unclasp the damaged spring from its hook and replace it with a fresh spring with the help of a plier.
The spring must be held and extended firmly with the help of a plier or some other suitable tool while clamping back to the hook.
Now place back the frame, adjust it in the recliner, and bolt it with all the bolts required to assemble it. Set the recliner back in the sitting position, sit in it, and check if it is working as you are expecting. Now, if the recliner is comfy enough to make you happy, then stitch the seat again and enjoy the rewards of your efforts.
Pro Tips
We highly recommend wearing goggles before dealing with the springs, as they may bounce back and hit your eyes.
While choosing the new spring, contact the manufacturer or find some local dealers who can provide you with the spring that matches close enough to the original spring.
read also: Adjusting a Recliner That Leans Back Too Far
Readjustment of The Pitch of The Recliner
What is the pitch of a recliner?
The pitch of the recliner is the height when the recliner is closed and placed in an upward position.
Diagnosis of the issue
While sitting in a recliner in an upright position, if your feet cannot touch the floor, the pitch of the chair needs to be reduced.
If your knees are folded and your legs are not angled comfortably in a sitting position, the pitch of the chair is low and needs to be raised.
Luckily, you can adjust the pitch of the chair on your own with the help of an adjustable wrench and a screwdriver.
How do I modulate the pitch of the recliner?
“Adjusting the base setting will adjust the pitch of the recliner. “
Now, if you intend to customize the pitch of your recliner, keep reading this.
Step 1
Repeat the same procedure to reach the mechanism of the chair base as we did earlier. Flip over your recliner with the backrest in a vertical position and the footrest closed. Here you can see the bolts in the base’s backside or cam. Remember, these bolts are distinguished from the bolts used to adjust the tension. Carefully lax the bolt, but don’t take it out completely.
Step 2
Now you have to locate the front bolts placed on each side of the mechanism. Pick up an adjustable wrench or a power ratchet and loose front bolts to take them out of the frame.
It’s time to move the frame quickly. If you need to gain more front pitch, slide the frame back. If you need to raise the rear pitch, slide the frame forward to get the result.
Step 3
After setting the cam, fix the bolts to the holes with the help of tools. Hurray! You have customized your recliner’s pitch successfully.
To double-check, tilt the recliner back to a sitting position and sit in it with the backrest in an upright position. If your heels are flat on the floor and your knees are at an angle of 90 degrees, your recliner’s pitch is excellent for you.
Checkout: Most Comfortable Recliners
To Conclude
It is an outstanding achievement if this article works for you and you adjust your recliner at home. When all is said and done, I will give a bit of advice: if you are determined to overhaul your recliner at home, be careful and work with delicacy, as a single act or slight drift can wreck your recliner for good or cost you a huge repair cost.


[…] claim to fame is the high-tech manufacturing of the recliner that enables you to recline back or adjust your feet with a finger […]
[…] style, you can find various recliner chairs with high legs or a beachside low gravity recliner. They may have a manually operated handle or a […]
[…] to those that are operated by electric motors. They come with one or two motors that allow you to adjust the recliner to your desired […]
[…] adjust the recline angle of a manual recliner, you may need to adjust the tension of the recline mechanism. Here are […]
[…] position is essential. In this guide, we will walk you through the step-by-step process of adjusting a recliner chair, ensuring you can make the most of its features and find your perfect level of […]
[…] are many different types of recliner chairs available today, including traditional leather chairs and even some specialty models like massage chairs, some with […]
[…] Read also: How To Adjust Recliner Chair […]
[…] Read also: How To Adjust Recliner Chair […]
[…] Read also: How To Adjust Recliner Chair […]
[…] Read also: How To Adjust Recliner Chair […]